News Update :

Stretching... A Few Key Points

Penulis : Unknown on Tuesday, November 12, 2013 | 7:36 PM

Tuesday, November 12, 2013

by Dan Frost
 
Working on your swing with resistance bands can quickly produce results – not only do they enable you to train with the benefit of enhanced sensations as you rehearse the exercises but you also enjoy much greater freedom of movement when the band is then removed.
I'm going to show you a few relatively easy exercises that will greatly improve your positional awareness in the swing, the feeling of 'coil' as you turn and load your bigger muscles, and thus simplify the learning experience, adding a kinesthetic element to your development.
The beauty of these drills is that they can be rehearsed either at home, in the office or out on the range. In as little as 20 minutes you can design a valuable work-out and see immediate improvement. For those of you who feel up to the challenge, a few of these exercises lend themselves to hitting shots.
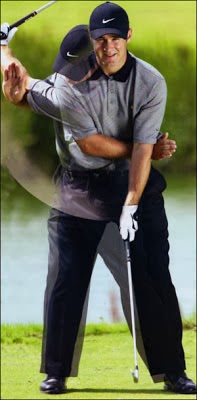
Learn to 'load'

You may have heard about the importance of 'coil' and 'resistance' in the swing. Well, this exercise quickly wakes you up to the dynamics involved as you turn and rotate your upper body against the resistance of a strong leg action to get 'loaded' at the top of the backswing. To get started, tie one end of the resistance band just above your left knee, knotting it in place, and wrap the other end around the upper part of your left arm. Adjust the band so that it is nicely taut when you then assume your set up position – get your left shoulder up a little as you create a good spine angle (above). A good posture pre-sets good motion: all you need to do is resist from the knee and stretch the band as you turn your left shoulder under your chin. You will feel a fantastic coiling up of the big muscles in your torso as you reach the top – hold it there for a few seconds to maximise the benefit of the exercise, then repeat.

 
Stay 'grounded'

Related to the 'load' exercise, this one is designed to improve the foundation of your swing –
i.e. the quality of your leg action. It's simple: loop the resistance band just above the knees, and draw it tight enough so that when you are in the address position your leg muscles feel 'engaged'.
In a good posture (thigh muscles flexed) the key then is to keep your left foot grounded for as long as possible as you make your backswing.
As long as you keep that band in position, your legs will be encouraged to maintain a solid base to the swing (they are prevented from swaying about) and this enables you to turn and coil your upper body effectively over a resisting lower body action. At the top there should be more of an 'X'-like shape between your lower and upper body – one of the key ingredients to a powerful swing.


Compact, after Hogan
Ben Hogan was famous for rotating his forearms inwards as he set up to the ball, to the extent that his left elbow pointed at his left hip and his right elbow pointed at his right hip.
 
This distinctive position has been studied and copied by great players down the ages, and you can replicate it by looping a resistance band just above your elbows and tying it in place. This will encourage the arms/elbows to work in harmony with each other and with your body throughout the swing – as Hogan displayed to such devastating effect.

Getting the band in position at the setup can be quite tricky, and it might be a good idea to have a practice partner help you. Make sure that you rotate your forearms gently inwards as you settle into the address position, adjust the band until it's taut, then maintain that tension throughout your swing, checking your position back and through in a full-length mirror.
Not only will repeating this help you to develop a compact and reliable technique, but getting the arms working together will synchronise your arm and body motion so that those two components move at the same speed, which helps the arms to stay on plane. One final thought that can help you – when you rehearse this exercise, remind yourself 'left arm back, right arm through' as you make your swing – i.e. the left arm should be straight on the way back, the right arm should be straight on the way through.

Identify your 'inner circle'
 
The golf swing is most effective when the arms work in a simple circular motion around the
body – the spokes spinning around the hub of the wheel, if you like. This drill instantly improves your awareness of your own golf swing's 'inner circle'.

As I have here , loop the resistance band around your belt buckle and then take up the slack with your left hand, fixing the band on the club as you take your left hand grip. The key is then to resist with your middle, your belt buckle, as you swing. This will encourage better width and a nice circular shape to your arm swing. Maintaining this width (and keeping the band taut) as you transfer from backswing to downswing and then on into the follow-through will massively improve the kinetic chain of movement in the body. Rehearse this drill correctly and you'll find that the body naturally wants to support the arms, helping you to rotate more strongly all the way through the swing.


Resist with your belt buckle to create this dynamic tension in the backswing, and then maintain that feel as you move down into the transition. Note the stability in the lower body as the momentum is reversed. The body rerotates towards the target, the arms fall into a good hitting position. Width is maintained all the way through impact and into the through-swing, the arms extending to the target.
 
No more 'flying right elbow'


Good players control the shape and structure of their backswing with the position of the right arm/elbow. One of the big problems many amateurs struggle with is what's known as a 'flying right elbow', which occurs when the right arm fails to set correctly, the angle at the elbow is lost and the forearm flails all over the place. This drill trains the right arm to fold away correctly in the backswing so that the angle of the forearm does not exceed the spine angle. Attach the resistance band just above your left knee and loop the other end around your right arm at the elbow. Initially, I'd suggest starting out with comfortable one-armed swings to isolate the feeling of the right arm folding and setting correctly. After a few minutes apply your left hand to the grip and replicate that same feeling.

Clear the left hip


I'm sure you've heard the phrase 'clear the left hip'. It's easy to say but can be quite difficult to feel or put in to practise – hence the beauty of this exercise. Tie the resistance band through a belt buckle on your left hip and position the other end under your left hand grip. Then rehearse small swings or hit half shots with your focus on clearing the left hip so that the band is taut through the impact area and beyond.
How will this help your swing? Learning to clear the left hip will not only give you more space and freedom to swing through, it will also improve the quality of your leg action through the impact area, helping you drive more power into the back of the ball.

Backswing check: the plane truth
The backswing is usually the most difficult position to get right in the swing as we are
looking at the ball and our arms are behind us. Without a mirror you can't see whether you are on plane, but with the help of a resistance band you can at least learn to feel the correct position. Wrap the band around the centre of your left foot and place the other end under your left hand grip.
In the backswing you are looking for the band to brush the inside of your right thigh and your arms will work in front of the chest. You will instantly know if you have got this wrong as the band will either have no contact with the thigh, indicating that you have a steep arm plane, (below left) or will wrap over the leg creating a flat arm plane (below right).


Stronger ball striking
Golf is a game of opposites – yet few of us have the confidence to trust in that knowledge when it comes to the impact position. To make the ball go up, your job is to strike down, and you have to learn to trust it.
 
Trying to help the ball into the air is one of the most damaging faults in golf – and one this final exercise is designed to correct. Wrap one end of the band around your right foot and take up the slack as you secure the other end beneath your left hand grip.

The key then is to repeat simple half-swings, ensuring that the shaft leans forward at impact (similar to driving a hockey shot along the ground). Notice here that my left arm and the clubshaft form a straight line immediately after impact (not before!).

The more often you rehearse this and enjoy the sensation of being in a strong position post-impact the better your ball striking will become. You will enjoy exerting more pressure on the ball, the transfer of energy will be more efficient and you will hit the ball straighter and further.
comments | | Read More...

Train Key Muscles for Power

Improve your fitness & swing ‘sequencing’ with the medicine ball drill.


Working with a weighted medicine ball is a really effective way of improving the sequence of movements in your swing and – as a result – increasing speed and power. There are a number of specific benefits. To start with, it encourages you to set-up in an athletic position. Because you are supporting the weight of the ball you have to engage the important stabiliser muscles in your torso and legs, giving you a ‘grounded’ and balanced feeling.


From here, with that heavy weight in your hands, you are encouraged to initiate the turn into the backswing by using the bigger muscles of the torso, allowing the arms to simply be carried by the turn. Again, supporting that added weight should improve your forearm rotation as you move into the ‘loaded position’ at the top of your backswing. You really have to focus on supporting that weight at the top of the swing. Look how my lower half is very stable against my upper half in this position, a dynamic that maximises the energy in the wind-up and coil ready for the change of direction.
 
 
From the top you can see that the lower half of my body initiates the downward move – this is the correct athletic sequence for golf. With the heavy ball in your hands it is difficult not to enforce this as you unwind and swing through. This tiny change in momentum will help your arms to fall into a good delivery position and you can see how it is so easy then for the arms to rotate on the way through as the body rotates to a full finish. Look at the release position I’ve achieved as I swing through with the ball; my right hand rotates over my left as I release the ball and throw it towards the target.
 
You can finish the swing in two different ways, either concentrating on throwing the ball down the target line, or, alternatively, you can focus on swinging all the way through, holding the ball nice and still. Either way you will improve both the ‘sequencing’ and dynamic balance in your golf swing. With a club in your hands you can look forward to a much better rotation of the body and a more natural, athletic movement overall in the swing.
comments | | Read More...

What The Pro's Do

Four key thoughts from Robert Baker

Let me give you four tour proven key thoughts that will help you to make a solid, repeating swing.
 
Think 'Right Pocket Back'
 
The more flexible you are, the more likely it is that your hips rotate freely to assist you in making a good backswing.

But not everyone enjoys great flexibility, and for the average player this old Greg Norman tip gives you that stimulus to turn the hips out of the way, allowing your weight to shift across and on to the right heel, opening an avenue where the left arm can swing across the chest.

All you have to do is think 'Right Pocket Back' (RPB). This simple reminder will free up the backswing and gets you fully 'loaded' into your right side.

As the right pocket goes gradually back, the left side can enjoy the freedom to turn behind the ball. The result is a fully coiled swing that sees the club travel on the desired inside path, which sets up a nice shallow approach into the ball. Work on this and you will find that you 'trap' the ball at impact, squeezing it off the turf with the irons as the clubhead tracks the target.
 
Keep a level belt line for a better backswing coil, and get behind the ball
Here is another great swing thought - and one that is inter-related with that idea of turning the Right Pocket Back. Maintaining a level belt line as you turn your shoulders and upper body allows your weight to go fully on o the right heel, which gives you more time to fully wind and unwind your swing for maximum clubhead speed.

There's nothing worse than seeing a golfer with a short, quick swing which chops down on the ball. And the last thing you want is a tilted belt line, like this above, where the right hip/right pocket is very high and the weight hangs on the left side.
From here you are clearly on track to deliver too much of a downward chopping motion on the ball. You can go a long way towards eliminating that problem if you focus on keeping your belt line level and simply get your weight on to your right heel as you complete your backswing. Having negotiated the 'settle' at the start of the downswing, you can move into the ball and into your left side as you unwind.
Work on this in tandem with the Right Pocket Back idea, and with a little practice you will enjoy a much more efficient swing, one that generates more power and allows you to sweep the ball off the turf (as opposed to digging down into it).

 
Shorten your backswing for greater control, consistency
 
Here is a typical example of a backswing that is too long, the right arm having folded to such an extent that the club has collapsed way past the parallel. The root cause of this is usually that the body stops turning in the backswing while the arms and the club continue to go that extra distance. Clearly, it's very difficult to properly synchronise your arm and body motion from here. Basically, this sloppy-looking swing makes it difficult to get the right elbow in front of your body on the way back down, a key move that drops the grip-end of the club into what we term a good 'lag' position. When you get it this far past the parallel at the top, the momentum of the club is simply out of sync with the body, to the extent that you then end up playing 'catch up' on the way back to the ball, with little hope of doing so consistently.
As you struggle to get the right elbow (the 'fulcrum' or leverage point of your swing) in front of the right hip, the club, in most instances, will be released too early (which can lead to both fat and thin shots). If this type of problem affects you, the only way forward is to work on shortening the backswing to create the box-type look that you see here (both in the throwing exercise, and in Ernie's full swing).
Look at Ernie Els as he makes his backswing with a driver. Compact, poised and controlled. This is about as far as any amateur needs to take the backswing. Look to create this box shape with the right arm, forming a 90-degree angle between the forearm and the clubshaft, the right elbow being to the side of your body. You will then find dropping your arms back down in front of the body a whole lot easier, which will give you greater freedom to release the club through the ball.
 
The throwing action can also help. It's simply another good way to experience where your right arm should be. The right pocket goes back, your belt line remains level and the right arm is at a 90-degree angle at the top of the swing. The weight has gone into the right heel, left shoulder over right knee. No sloppiness at all.
The 'synchronisation' of arms and body is the ultimate goal
 
One of the key phrases that I use in my teaching is that 'the wheel moves the spokes'. In
other words, the shoulders control the arms during the swing. And a great way to develop your sense of this 'togetherness', or harmony, in your swing is to get yourself a hoola-hoop and practise the drill you see here on the left. Immediately it will teach you how to blend the shoulder turn with the arm swing to make a synchronised movement to the top, one that sees the arms and shoulders complete the backswing together (which enhances the chances of them coming down together).

In tandem with this exercise I also recommend the medicine ball drill. This is a terrific way of building up the strength of your body 'centre' in the swing, gathering up steam as you learn to rotate your trunk back and forth (the momentum of which is then transferred down through the clubshaft via centrifugal force in the swing itself).
The idea is that as you build up speed with the body, the wrists 'snap' as you ultimately release the clubhead into the ball. The arms are swinging down in front of the body, and as you clear the hips through impact, your whole right side can enjoy ripping through the shot. This is perfectly illustrated here by Ernie as he launches into a driver. The arms have dropped down, the ankles have rolled, the knees have shifted, and now with the right elbow in front of the right hip, he can release the wrists and let the right hip kick in to square the clubface at impact.


comments | | Read More...

Width Trevor Immelman

A great deal of my time on the practice tee is spent working on one aspect of my swing that I believe is the secret to enjoying the freedom to strike the ball correctly.
Width.

I am not a player who thinks too much about hingeing or setting the wrists too early in the backswing.
 
Being relatively short, I believe I am much better off creating width with a good upper-body turn away from the target, and by extending my left arm and left shoulder to really stretch and turn behind the ball, ready to unwind into it. This drill really helps me place the back of my right hand behind my left elbow and then pull myself into this coiled-up position, the left arm comfortably straight when fairly deep into the backswing. When I repeat that a few times and then go back to hitting shots, I am reminded of the benefits of creating and maintaining width. Try it, and I think you will find that it helps your swing, too.

comments | | Read More...

Work This Way

Keith Williams
Feel the fingers and improve the rhythm and flow of your swing

First up, a drill that not only promotes the correct grip pressure in your fingers but one that encourages you to swing the club with an enhanced sense of rhythm, timing and balance. Not bad for starters.

The key pressure points in the grip are the last three fingers of the left hand and the middle two on the right. Squeezing gently with these fingers enables you to maintain a controlled amount of pressure during the swing (yet at the same time leaving the hands and arms relaxed).
The remaining fingers and the thumb provide the support for these pressure fingers.
To start this drill, grip the club with just these fingers on the shaft. Then try to make a few easy practice swings, initially with a three-quarter length movement. Hit a few shots with a mid-iron. If you find that you have to strain to hold on to the club, you are swinging too hard.

As you learn to make a flowing swing and control the motion of the clubhead, you will be improving the general co¬ordination and the rhythm of your swing, which in turn will improve the quality and the consistency of your ball striking.


Check your flight path
 
This alignment tip is ideal for golfers of all abilities. As a prop, you'll need an old golf shaft
(or a cane) set in the ground a few feet ahead of the ball, angled towards your target. As you then hit balls, focusing on the shaft enables you to check the alignment of the clubface at address, and serves as a good ball-flight indicator as you study each shot.

Clearly, by observing the initial flight and subsequent trajectory of each shot, you will learn a great deal about the line of your swing. For instance, a ball that starts left of the target before turning back towards it (or even to the right) indicates a slicing action - i.e. an out-to-in swing path, the clubface open to that path at impact.

A ball starting right of the shaft before spinning to the left - i.e. with draw or hook-spin - tells you that your swing has travelled from in-to-out through impact, and that the clubface is closed in relation to that path.
With this in mind, practise trying to get the ball to start over the shaft with a straight flight towards the target. The better you can get at this, the more accurate your approach shots will be on the course.
 
Driving: brush the ball away for better width in your backswing
 
Good drivers of the ball create and then maintain width throughout their swing. And it all starts with the first move, keeping the club low and wide away from the ball. This drill will similarly help you to get your swing started on track.

By teeing a second ball about 15 inches behind the one you intend to hit (but positioned on a path that is slightly inside the original), you create a situation that forces you to focus on making a smooth and shallow start to the backswing. The object of the exercise is to gently brush away the rear ball as you glide the clubhead back.
Rehearsing this drill will help you to achieve good width at the start of your swing, and reward you with the proper co¬ordination of the turning components of your swing as you continue your wind up. It also encourages you to shift your weight across on to the right side, which is vital in terms of getting behind the ball with a full turn and coil.
 
Let the gate be your guide for better impact
 
This impact drill is not as easy as it first appears, but practised regularly it will surely improve your ball-striking.

As I have done, create a 'gate' by placing two tee-pegs either side of the clubhead. (To begin with, leave about an inch to spare on either side.) Then hit a few shots, aiming to swing the clubhead clean through the gate. Don't try to guide or steer the club; instead, concentrate on swinging freely, using the tee-pegs to help you focus on returning the clubface squarely through impact towards the target.
You may find this intimidating to begin with, but should the clubhead come into contact with either of the tee-pegs, you will at least get some excellent feedback in terms of the line of your swing and the quality of your impact position. For example, if you should dislodge the inner peg, you will know that your swing is delivering the clubhead too much from in-to-out; if you strike the outer peg, the club is travelling too much from out-to-in.
Use this information to help you work on improving the shape and the line of your swing until you can release the club and strike the ball without touching the gate.
Naturally, the closer the tee-pegs are placed together, the tougher it is to swing between them. It's up to you to find out just how accurate you can be.

Spot the ball
 
In this drill, aiming to strike a black dot painted on the back of the ball will help you to feel and recognise the different swing paths that we associate with shaping the ball, either with left-to-right spin (i.e. fade) or right-to-left spin (draw).
First, though, the neutral swing that produces a straight shot. For this you should place the ball on the tee so that the dot is presented dead centre, begging you to strike it squarely. A relatively straight ball flight would be the expected outcome.
 
TO DRAW To encourage the in-to-out swing path that produces right-to-left spin, place the ball on the tee so that the dot is on the inside and lower quadrant of the ball. To strike the dot now requires that the clubface travels along a distinctly inside track - just what you want in order to produce a draw (or, in the extreme, a hook).
 
 
TO FADE By contrast, to fade the ball you must encourage a swing that sees the clubhead approach the ball on a slightly out-to-in path. To work on this, place the ball on the tee so that the dot is on the outside and upper quadrant of the ball. Clearly, to strike the dot the clubface must now approach the ball at a steepish angle and from out-to-in - as it should to play a fade (or, if accentuated, a slice). The beauty of this sort of visualisation drill is that it can help you to eliminate faults. For example, if you are an habitual slicer of the ball, spend some time hitting shots with the dot in the draw-shape position. Counteract your fault. Visualise the clubhead approaching the ball from the inside and release your right hand to get it spinning from right-to-left. If you are prone to hooking the ball, do the opposite. Place the ball on the tee so that the dot is in the fade position and work on steepening your angle of attack to get the ball moving from left-to-right.
comments | | Read More...

Change Tee Heights

Penulis : Unknown on Saturday, November 9, 2013 | 7:12 PM

Saturday, November 9, 2013

For many players (and that includes some on tour), trying to work a shot with the driver is intimidating, mostly because they have trouble hitting just a regular no-nonsense shot with that club.
Some players make an exaggerated grip change, open or close the stance dramatically, or open or close the face of the club. That's how a lot of problems get started.
All those changes make it hard to get a feel for how a shot will come off. You can't see the shot in your mind, so you don't swing confidently.
I don't want to make any shot harder than it has to be. When I hit my driver, I always start from the same basic setup, then make subtle adjustments from there to get the ball flight I 
want.
Most important, I never change my grip — it's the same for a high power fade and a low draw. I do the minimum that will get the job done.
Usually, that means a slight adjustment in ball position, or teeing it higher or lower. Then I think about finishing more around my body for a draw, and in a higher, more extended position for a fade.

comments | | Read More...

Consistent Ball Position

Tim Barter
 
When it comes to ball position, I find that many amateurs fall foul of what can only be described as an optical illusion, believing the ball moves within the stance. But take a look at these set-up positions and study closely the ball position in relation to the left heel - it's consistent throughout.
 
The point I am making is that for all your irons shot - whether you are playing a full 5-iron, a controlled 9-iron or a standard chip (as illustrated from left to right above), the ball position should be consistent at roughly a clubhead's width inside your left heel.
As one of the on-course analysts for SKY Sports, I spend a lot of my time watching and talking to the best players in the world, and the vast majority follow this rule-of-thumb for the simple reason that it promotes consistency in their ball-striking. Of course, the exact width of the stance varies according to the size of the pivot you intend make: with a 5-iron you need a reasonably wide stance to provide the necessary foundation for a full shoulder turn, and, as you can see clearly here, with the ball played a club-head's width inside the left heel, the majority of my body is set behind the ball (which promotes a more sweeping angle of attack.
 
Moving down to the 9-iron (a club that draws less heavily on the pivot motion), I simply narrow my stance by bringing the right foot in towards the left. The ball position is exactly as before (i.e. a clubhead's width inside the left heel), the key being that by making that adjustment to my stance, and easing my weight slightly more onto my left side, my sternum and centre of gravity are now directly over the ball, which will help to promote a more descending angle of attack, thus promoting the backspin that you are looking to create to control these approach shots.
 
 
Moving down the scale, the ball is again played a clubhead inside the left heel for standard chip shot, but the right foot is now drawn in so close to the left that the impression given is that the ball is now being played off the back foot. Critically, my sternum is now in front of the ball, my weight heavily in favour of the left side - a position that pro¬motes the arms-and-shoulder motion I am looking to create.
In summary, do as the pro's do: for all of the iron shots, play the ball a clubhead inside your left heel and simply move your right foot to adjust the width as required. Move the ball to a position directly opposite the inside of the left heel for the woods. Next time you play or practise, work on these simple guidelines -I guarantee they will make you a more consistent ball-striker.
 
comments | | Read More...
 
Design Template by panjz-online | Support by creating website | Powered by Blogger