News Update :

Rough Justice-2

Penulis : Unknown on Friday, November 15, 2013 | 10:43 PM

Friday, November 15, 2013

This will assist you in keeping the clubface open throughout the swing and - more to the point - returning it in that open position so that it slides beneath the ball through impact.

There's a certain flowing quality that is vital to this swing, and this is something you must work to engender through what I would term a 'fluid' wrist action. The hands and forearms must be 'soft' so the club is encouraged to release quite early on the way down and on up into the follow through.

Another tip will further help you here: as you release the club through the grass, you actually want to feel as though your hands and the handle of the club are slowing down,while the clubhead itself is accelerating.

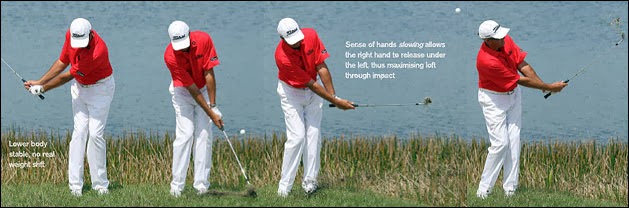
The net effect of this will be that you have a real sense of the right hand releasing underneath the left, which I hope you get a good impression of from the sequence towards the camera.

Look at the way the palm of the right hand pretty much mirrors the clubface as it is released - that is what guarantees the maximum loft is in play as you swing through the grass.

Another point to note is that the wrists hinge up freely into the follow-through,while the ball pops up softly and will land and stop fairly quickly, even though you are playing from the rough. Work on length of your swing to control distance.


Soft pop-up from a jungle lie - it is possible!

A typical reaction to finding your ball in this type of hay is to think you have no option but to take a hack and hope for the best. But a tour player will take an entirely different view.

Because there is an advanced technique that enables you to slide the clubface beneath the ball and have it come up soft. The key,with a sand iron or utility wedge is in the way you initially set up to the shot, the the open clubface preset in the delivery position.

The way the shaft is angled away from the target line is important; when you return the club into this position on the downswing, effectively with the heel leading, you are able to cut through the grass more easily on the way to impact.

Set in the open position, the heel of the club 'scythes through the long grass before the final release of the right hand in that split-second before impact squares up the leading edge, enabling you to pull the clubface under the ball.


So, to recap:

(1)At the set up, you want a fairly open stance, your weight favouring your left side.

(2) Preset that open face, turning your wrists and the clubshaft to the right until the shaft is almost parallel with the line across your toes.This is your starting position (I would always recommend gripping down on the club for any sort of trouble shot, as that immediately gives you a better feel for the clubhead).

(3)Your weight remains on the left side as you then complete your backswing, with a full hingeing of the wrists.

(4) Return to that preset position on the way back down, cutting through the grass before releasing the right hand to add a final burst of acceleration as you pull the clubface beneath the ball.

(5) Look at the position of the right hand and the clubface at the finish.The palm of the right hand and the clubface point up towards the sky,which confirms you have maintained an open face through the impact area.

Delivering the verdict: These sequence show that- in the final frames into impact - the open clubface is squared up by the right hand as it swings down, across and beneath the ball. Having pre-set the clubface in a fairly open position at address, this releasing of the right hand is the key, as it is that action which accelerates the open face all the way through the hitting area

Hybrid to the Rescue!


comments | | Read More...

Rough Justice

Tour players spend most of their time off the course working on developing their short-game skills - and not always from a perfect lie on the fairway.


Miss a green and you never quite know what sort of lie to expect, and so the smart players test themselves from all sorts of situations, and figure out the specific technique they need to get a ball up and down from pretty much anywhere.
So let me share with you some tour secrets that can help you to extend the versatility of your short-game with a look at how to take the ball cleanly from fluffy grass, how to get the clubhead beneath the ball for height and control from longer stuff and even how to play a controlled high shot from the jungle.
Oh, and a useful shot with the ever-trusty hybrid.
As ever, imagination is the mother of invention...

Wide, U-shaped stroke 'collects' the ball
Let's look first at a common scenario: you have missed the green by a matter of a few feet and find your ball sitting atop fluffy grass. It's a perfect lie for smashing a driver,or a fairway wood, but how do you go about playing a delicate chip shot that gets you the clean contact you need to control the flight and landing speed of the ball on the green?
From this type of lie,when the ball is sitting 'up', there's always that danger of catching it off the top of the clubface,which deadens impact. So you need a technique that guarantees a clean and precise strike. This is what you do:go down the shaft of whatever club you need to give you the desired loft-and-roll combination,and then,as you create your set-up, sit the club up on its toe a little.


Stand almost as you would to putt - here I'm even using my regular putting grip. With your feet together, alignment slightly open to the flag, you want to feel that your arms hang comfortably close to your body,while your weight just eases towards the front foot. Play the ball from middle to back in your stance (experiment), so that your hands are slightly ahead,with the shaft leaning gently to the target.
From here, it's a relatively simple case of working the upper body, arms, hands and club as one unit. There's little wrist action to speak of, and a natural U-shaped swing collects the ball.


How to play a 'pop-up' when the ball is sitting down


So, you find your ball just a few yards off the edge of the green, but sitting down a little in fluffy rough.The pin is just a few paces onto the green, and so you need to get the ball up pretty quickly and have it land and stop softly within a relatively short area - not easy out of this sort of rough.
Well, here's the solution. Take your sand iron or lob wedge, and as you set up with the ball more or less in the centre of your stance, 'soften' your left hand and wrist so you create this distinct 'cup' shape.


comments | | Read More...

Scythe of Relief

Whenever I get the chance to play a practice
round with someone like Nick Faldo, I snap it
up.

Faldo is a player I have admired as much
for his short game as for his ideas on the
swing. Nick has a terrific imagination around the greens and is always experimenting with different types of shot - such as this one
he showed me at Augusta last year.

From fluffy rough he described playing the shot with a 'scything' action - and I think you'll like it.

Maximise width, minimise hand action...

Next time you find yourself in fluffy rough just off the green, do as Nick Faldo suggests and set up to play the shot with a scything motion. It's a bit like a bunker shot, only here you are using the grass as the buffer. Out of this sort of lie, the key is to stay aggressive through the shot.
You don't want to be decelerating through it, otherwise the clubhead will get caught up and you get the goofy one that doesn't quite get out. So get yourself set up like you would for a greenside sand shot. Open the clubface until it is almost lying flat about an inch or so behind the ball, and compensate

with a fairly open body alignment. A good tip here is to stand a little further from the ball than you would for a normal pitch, as that gets your hands nice and low at the set-up, which helps you to create the scything action through the ball. The key then is to make a wide, smooth swing (following the line of your toes) and to keep your hands quiet throughout.

Only with practice will you get a feel for the thickness of the grass and the way the ball reacts from it. All I think about is trusting my swing and swinging the club into the grass a good inch behind the ball. Even if I have a lot of green, I try to fly it most of the way.


comments | | Read More...

Sharper Short Game

The principles that govern your pitching action are exactly the same as those you use in the full swing. From 100 yards and in, it's your versatility that counts.

On creating a compact, repeating action
When you watch good players hitting wedge shots, you might be surprised at just how aggressive they are through the ball. For a shot of anything from 50 to 90 yards or so, they use speed to create the perfect ball-turf strike that imparts backspin. This is how they control the flight of the ball and its subsequent reaction on the green.
The secret to this close-game control is a swing that sees the hands, arms and body work in harmony from the set-up all the way to the finish. As such, all the work that you put into the short game actually improves your full swing - because this is the very 'core' of your motion.
I take great care to make sure that the hands and arms work with the body as I make these mini-swings. The wrists hinge naturally and the club swings up freely to create the backswing.

Find your range
Distance control in the short game is the key to consistently good scoring, and the best advice is this: once you have a reasonably good technique, go out and establish your 'best' distances with each of your pitching clubs. The key is to go out and practise your most reliable swing. For me that's the three-quarter action you see here. I will pitch 20 balls with this swing and then measure the landing distance to give me a precise yardage I know can trust. I then repeat the exercise with all of my wedges to give me a span of scoring shots.


comments | | Read More...

Short Game Primer

One of the principles that we work on is that the left wrist is always in control of what the clubface is doing. This is a feeling you should cultivate in all areas of the game, but particularly in the short game, where there are so many different shots to master.
Golf is a two-handed game, obviously, but the danger (speaking for a right-handed player) is that the right hand will want to dominate the shot. That's why it is always a good idea to train with the left hand only, as it develops the overall feelings you need to be looking for.
Keep this in mind as you work on the following short-game lessons, starting here in the sand.

Sand Play

The trick to good bunker play is to use the so-called 'bounce' of the club. To do this, you not only open the clubface a little at the set-up but you have to then make sure you keep it open throughout the swing.

That's all down to the way the wrists hinge in the swing, the key being to prime your wrist action with a rehearsal swing that sees the left wrist 'cup' and the clubface work open as it swings op. It's as easy as telling the time: when the left wrist hinges and 'cups' correctly you should be able to clearly read the time on your watch.


Prime your wrist action, then trust it

To use the bounce of the sand-wedge properly, you want the clubface open at the set-up and to remain open throughout your swing. What you don't want is to close the face down with a first move that looks anything like this (below). The left wrist is working under the right the clubface twisted down, looking at the sand. 'Cupping' your left wrist will correct this, and the open clubface will easily bounce through the sand.


comments | | Read More...

Short and Sweet

Revolving around the way you set up to the ball, the basic chipping and pitching action is simplicity itself.

Let's keep things simple
Most golfers over-complicate the short game when in reality the basic chipping and pitching skills are quite straightforward.

Over this and the following spread, I want to leave you with a couple of pro pointers that will enable you to go out and work effectively on improving your chipping and pitching skills - vital for lowering your scores.

In both cases, I believe that understanding ball position is one of the keys to the correct technique.

Moving the ball back a little, towards the right heel, leads you to a good strike, which determines your ability to control both flight and distance.

A swing in miniature
That's what good pitching technique is: the core movement involves the hands, arms and upper body working together to create a compact action that enables you to control the distance you land the ball. What you are looking for is the essence of a full swing scaled down in terms of body turn and speed.

Pitching is all about your ability to control the speed of the delivery through impact. That's why the towel drill is so effective; it helps to establish the vital connection between the arms and upper body that enables you to control the speed at which you swing the clubhead.


comments | | Read More...

Taking Sand After Impact

Why taking sand after the ball is as important as what you take before it.


Delivering a shallow swing arc through the impact area is the key to successful and consistent greenside sand play. Here's a thought that will help you to do just that.

In practice, score a couple of lines in the sand, some six to eight inches apart, and place the ball midway between them. The key is to focus on taking a shallow divot of sand that extends all the way from the first line (your point of entry) all the way to the second line, beyond the ball. That's your exit strategy. If you focus on stretching the divot of sand all the way to that second line, you'll soon develop a shallow swing that rewards you with a controlled escape every time.


comments | | Read More...

Talk Sand Play-2

ACCELERATION HERE... The smooth unwinding of the downswing sees the clubhead accelerate on its way to impact – as I mentioned earlier, the key is that you keep the clubhead moving throughout the delivery, focusing on that entry point an inch behind the ball

'SLAP' THE SAND As you practise and improve your bunker play, you will get used to hearing the sound of a good sand shot – a 'fizz' – as the flange on the club works as it is designed to do, surfing through the sand, taking a shallow divot – and with it the ball
RELEASE RIGHT HAND Gary Player is known as the best bunker player the game has seen, and, as he tells you overleaf, you cannot hope to play these shots stiff-wristed. You need to cultivate a good wrist action, both on the way back and then releasing the club on the way through. This crossover of the wrists is a sign of a natural release that not only guarantees the clubhead keeps moving but takes you on to a balanced finish

ENJOY THE VIEW! One of the most common faults I see amateurs make is to attack the sand with a short, stabby swing – and they usually end up off balance. But if you learn to play these shots with the emphasis on repeating a smooth rhythm I guarantee you'll enjoy watching the results as you hold a balanced finish!

Wrist action gives you the ability to 'release'

When playing any type of bunker shot, the one thing you cannot expect to do is achieve a successful result with wooden or stiff wrists. It doesn't work. You, know, in many areas of this game I'm the first to tell you there are generally no hard and fast rules, everyone is different, but the one thing you must do here is cock your wrists so that you are able to release the clubhead and get it moving through the sand. We're not playing on grass, we're in sand, which really stops the club. So work on your wrist-cock to get that nice bit of acceleration.

Hit a little harder up the slope to make the desired distance

Practise these shots long enough and you'll discover it's hard to hit that 30- or 40 yard shot with a sand-iron. So why not experiment with other clubs? In a tournament I might use an 8- or 9-iron, depending on the lie and how I see the shot to the pin. I simply go down the shaft and play the shot as you see above. Try it and you'll discover you can play a longer bunker shot more easily. By focusing on entering the sand a consistent distance behind the ball – just an inch or so – and develop that wrist action to accelerate the club up the slope. – Gary Player

Body and slope in tune

Here on the up slope, there's no need to add loft to the clubface – the up slope automatically does that for you. So, take a settled, comfortable stance, with your body angled to match the slope. You don't want your weight leaning against the slope – the trick is to get your body tuned to the gradient, as you see here

USE YOUR WRISTS This essential wrist-cock on the way back gets the clubhead swinging up (look at that angle between my left arm and the clubshaft!) and also helps you to feel the rhythm as you get the clubhead swinging

RELEASE UP THE SLOPE Remember, the effect of the up slope is to make the ball fly higher, so you have to make sure you hit these shots a little harder than you would to achieve the same distance from a level lie. The way you set up to the ball in the first place helps you to play up the slope, and not straight into it


The down slope

This is a tough situation, no doubt about it. Watch here how I play this shot right off the back foot – that's how you make the necessary contact with the sand on a downhill lie. The ball is going to come out low and run like crazy, so you have to adjust your expectation levels. (Don't try to hit a high shot from here – you'll only end up scooping it.)

You know, sometimes in this game you have to accept the fact that you've hit a poor shot to end up in this position, and you have to play for your bogey. Don't try and force the issue. On the up slope (sequence above) the ball will always come out high – and that's a shot you can still get close to the pin if you adjust the speed into the sand; on this down slope it's going to come out low. And from here a good result is getting the ball out and somewhere on the green, albeit past the hole. As I say, sometimes you have to take your bogey and move on. Gary Player

ADJUST YOUR SET-UP – AND YOUR EXPECTATION Look how far I'm gripping down the shaft here – that's a good tip when you find yourself in the back of a bunker and need to avoid the back lip as you get your swing started. And this is not a shot you can expect to get close – getting the ball out is a good result from this lie

CHOP & RELEASE In this situation, the key is to chop down sharply into the sand and keep the clubhead moving on through, down the slope (again, look at the release of the right hand), to what will be a relatively short finish. The the ball will come out low and without any spin, so it's going to run on the green
comments | | Read More...

Talk Sand Play

The world's No.1 coach, David Leadbetter, found himself cast in the unlikely role of spectator as Ernie Els and Gary Player put on an impromptu bunker clinic during the filming of a video for sponsors SAP earlier this year at Old Palm Golf Club in Palm Beach, Florida. After a three-hole shoot-out, Ernie and Gary spent a few minutes sharing their thoughts on bunker play, taking in turns to demonstrate the skills that have made both men legends in the game. Courtesy of SAP, Golf International dropped in on their conversation..


KNOW YOUR SAND-IRON "I think the one main thing you have to understand is the sand iron is designed differently to the other irons in the golf bag. You have this big area of metal on the sole of the club – the flange – and the key on the majority of these basic green side shots is that you aim to get the back edge of the flange entering the sand first, and not the leading edge. That just wants to dig down too deep and stop. The secret here is that the clubhead is always moving through the sand, and you achieve that by gliding or surfing the flange through, which is exactly what it's designed to do. I always aim to focus on a spot an inch or so behind the ball. That's where I want to make contact. There's always a bit of 'give' in sand, so don't be afraid to accelerate the clubhead – like I say, you have to keep the clubhead moving. That's the secret. Ernie Els

SMOOTH 'n' EASY Here, on a regular sand shot, with a good lie, the clubface is opened up just a fraction (this is something you can and must experiment with), the ball is in the middle of the feet, my weight pretty evenly spread. As I start the club back, you'll notice there's an early hint of a wrist action – that helps me to get a real feel for the clubhead and sets my rhythm for the swing. And all the time I'm focused on entering the sand an inch behind the ball

SWING IN HARMONY The wrists, arms and shoulders are working together to create a connected swing. Note there's relatively little hip turn involved – with the feet nicely grounded, this is basically all hands, arms and upper body

COMPACT, CONTROLLED This is the full extent of my backswing for typical green side bunker shots – it's all you need, too. A good turn of the shoulders, with a full wrist cock, will give you all the acceleration you need in the downswing. My weight remains even between the feet


comments | | Read More...

The Half Wedge

One of my goals heading into this season was to sharpen my game from 100 yards and in. Within that range, the 30- to 60-yard shot -the half-wedge executed with less than a full swing-needed special attention.

This is one area of the game where I wanted to maintain an aggressive approach, to go for virtually every flagstick. But with course set-ups on the PGA Tour getting more difficult, with more tucked pins and holes cut closer to the edges of the greens, I needed to be more precise.

I worked hard at improving my control of distance, trajectory and spin. The effort has really paid off. Right now, there's no pin I can't go at without full confidence in my ability to get the ball close.

Many amateurs find the half-wedge shot to be awkward, and when sand or water are involved, downright scary. If you tend to hit the ball fat or thin, can't decide how big a swing you should make, or find yourself coming up long or short, try my system.

It will erase your fear and give you the consistency and control you've been looking for.


Swing Aggressively

I don't think of the 60-yard shot as a 'short' shot. I generate as much speed through impact as my restricted backswing will comfortably allow. I want to swing with a tempo that is nice and brisk. That's the type of swing you make on full shots and the one you're most likely to execute with good timing and the correct sequence of movement.

Remember, "short and aggressive" is better than "long and lazy".

3 Things You Never Want To Do


Learn to 'hinge and hold'

Throughout the downswing and into the follow-through, try to maintain the same degree of wrist cock you established on the backswing. You can't help but unhinge your wrists to some extent, but your goal is to avoid getting too handsy. The 'hinge-and-hold' technique will help you to make solid contact.

comments | | Read More...

The Professional Touch-2


Use your experience and judgment to visualise how the ball will react upon landing – identify your landing area and focus your attention there, not on the flag

Basic chipping technique

– how to pre-set a good impact position To impart the controlling backspin you are looking for on a basic greenside chip shot (indeed on any iron approach shot from, say, the 6-iron and down) your goal is to take ball-then-turf – i.e. good technique sees the clubhead meet the ball with a slightly descending blow. In a full swing the dynamics at work (as you shift your weight away from and then towards the target) enable you to achieve this without thinking about it, and you will see most good players remove a shallow divot with their iron shots. But when it comes to the short game, there is simply not the time nor the significant body action to transfer weight onto the forward foot to create that downward strike – and so you have to pre-set the conditions of impact at address. Here are the key checkpoints to follow:

• Adopt a comfortably narrow stance – this is surprisingly important, as it reduces leg action and helps to place the onus for control on the shoulders and upper body. (It is not like putting where the legs must remain still).

• Play the ball opposite inside of back heel – this is where the club will make contact with the ground when you make a a good chipping swing. So that’s exactly where we play the ball in order to enjoy taking the ball first before bruising the turf. (If you tend to hit the ground first then check your ball is not too far forward in your stance).

• Hands fall opposite inside of front leg – this ensures the shaft is set at the correct angle. You want the hands to be slightly ahead of the clubhead at address – just as they should be at impact. If they start in the correct place, then there is no need to compensate during the swing.

• Weight favours the front foot – a ratio of 65:35 is ideal. Again, you want your weight on your front foot at impact, so it makes sense to place it there in readiness at the set up. The swing is too short for a significant weight transfer so it needs to be ‘’pre-set’’ at address. During the chipping swing keep the weight on this foot to ensure a downward strike and good contact.

• Head just in front of the ball – unlike most full shots the head position with a chip is actually ahead of the ball. If you lean back to get your head behind the ball it puts your weight onto the back foot and this can cause you to hit the ground first. Passive hands, active shoulders

Clearly, a chip shot does not require any great power – it is a shot played with a relatively short swing and quiet, passive hands. Using your wrists increases clubhead speed – which may be desirable in certain situations, but not in the playing of a basic chip shot. With the motion generated by the shoulders, the arms and the club can be seen to interact and work together, and the ball is clipped forward with positive acceleration.

The most important swing key is the path the club takes during the execution of the shot. The backswing and follow-through are mirror images – what you do on one side of the ball you need to repeat on the other. The benefit of a mirror image path in chipping is that you will bruise the turf at the same point every time, giving you the benefit of a consistent strike on the ball.

With your feet together, you want to feel that you settle the majority of your weight on your forward foot, leaning gently toward the target. Your body centre is then nicely ahead of the ball, which is played opposite the rear toe

Now here’s a challenge: having completed your setup position, you should be able to lift your rear foot up off the ground and support your body on your forward leg. This actually creates a terrific drill – try hitting a few shots and experience the sensation of ‘pinching’ the ball off the turf with a descending strike


With ball back, weight forward, the handle leans to the target

Having pre-set impact, keeping your hands passive as the upper body controls the motion will see the hands lead the clubhead through the ball – perfect


In this situation a more lofted club is required to land the ball on the towel with a trajectory that sees it check and roll out the desired distance to the hole – it’s up to you to practice in order to perfect this art and develop your repertoire


Jeremy Dale is one of the world’s leading trick-shot exponents and one of the few who is as comfortable playing left-as he is right-handed. Visit his website for information on his one day Scoring Schools: www.jeremydale.com
comments | | Read More...

The Professional Touch

Identifying your landing area – and visualising the ball running to the hole from that point on the green – is the tour player’s secret to getting up and down. And you will immediately simplify your chipping strategy if you follow their example

There is nothing more satisfying than surveying a chip shot, identifying a safe landing area within a yard or two of the edge of the green, and then selecting the club that lands the ball on that point for it to check and roll out like a putt toward the flag. It’s a skill that can save you a handful of shots in a round of golf – and one that can be practised and honed in a relatively short time.

Size it all up – the lie determines the club

The first thing you have to consider on just about every shot is the lie of the ball – if you get unlucky around the green and find your ball is in thick rough or an old divot you are pretty much forced into taking a lofted club and using a fairly steep angle of attack to get the ball up and out – and your expectations have to be adjusted accordingly. But assuming a half-decent lie, you have options – and the key is to identify the club that simplifies the shot as far as possible. The art of choosing the right club boils down to practice and experience to understand how the varying loft through the iron swill affect flight and roll. But here’s a basic guide:

• 7 iron – one third flight, two thirds roll 
• 9 iron – half flight, half roll 
• Sand wedge – two thirds flight, one third roll

Once you have decided the landing point and selected a club then make a practice swing to get a feel for the shot. Remember, your job is to hit to the landing point so focus your attention on this point and not on the flag. Trust your decision is correct. If the shot lands accurately with the right flight, it will go close.

Practice tip: As I am doing here, if you get the chance to work around a green, place a towel a couple of yards onto the surface and focus on landing the ball on that point – it’s that control over landing distance that counts.

A useful mantra to helping you achieve a good set-up position for the regular chip shot is: “Ball back, hands forward, weight forward”. Repeat that as you place your feet comfortably together to create your stance and settle your body with your weight favouring the forward foot. Playing the ball opposite the inside of the back heel, the clubshaft will lean gently toward the target as you allow your arms to hang and make a good grip. Essentially, you have pre-set a good impact position, one you will find and repeat consistently if you allow the stroke to be governed by the movement of the upper body, hands passive


comments | | Read More...

Tick Tock - Clock face Wedge Distance Principle

How would you like to consistently get the ball inside 10 feet from within wedge range? I'm talking about those critical 'scoring' shots from, say, 120 yards and in? Just imagine how many shots you could save in a typical round.

The most common fault amateurs make when faced with what I call 'scoring' approach shots is deceleration into the ball – especially on any kind of 'half' shot when you are trying to take something off the maximum distance you could hit a particular club. Any time you decelerate you risk making a poor contact and that simply leads to inconsistency.

The method I advocate eliminates that problem. This method uses a smooth accelerating stroke which is highly repeatable and holds up in any pressure situation. To properly control your landing distances you need to control your rhythm. Remember, this is not a power swing designed to hit it the ball a long way. As a rule, I use only 75% of my full power on these shots – and I urge you to do the same to enjoy a softer flight, greater feel and more control on the trajectory of the shot and its landing.

Working on your wedge game is all about developing a scoring 'system'. Because this is such a vital aspect of the game, I carry four different wedges and use two distinct distance control swings – a 'system that gives me 8 accurate yardages between 35 and 120 yards.

THE SET-UP: It is critical that you use the same set-up every time you practice and execute this shot, as only then can you achieve quality feedback and improve. In the 7 years I have been working on this system my distances have barely changed.

BODY ALIGNMENT: Align your feet, knees, hips and shoulders parallel to your ball to target line.

BALL POSITION: Play the ball in the middle of your heels. Then turn your leading foot out by 15 degrees or so – this will open up the hips slightly,making it easier to clear through the ball. [It's an optical illusion that the ball then appears further back in the stance – but flaring out the left foot helps to promote a consistent strike.]

TIME TO WORK ON A PRO SCORING METHOD

I base all of my distance control shots on my hand position in relation to an imaginary clock face (six o'clock being the ball position). Basically, I work on a 9 o'clock to 3 o'clock swing for all 'part' shots of between 35 - 50 yards, increasing this to a 10.30 backswing to 12 o'clock follow-through on all other distance control swings for shots of between 60 and 120 yards. The goal every time is to swing your hands consistently to these positions with the same rhythm. This will give you the feel and control to hit accurate yardages time after time.

When you initially rehearse these moves from the set-up position, I'd suggest practising at first without a club in your hand – just make a few rehearsal moves. This takes the 'hit' out of the equation, and so improves your rhythm. When you feel comfortable, move on to hitting pitch shots and measuring your yardages. Take 12 balls to a grass range and work between your scoring clubs – i.e. your favourite wedges. Once you have hit all 12 balls with that relaxed, easy swing, pace out to the centre of the cluster (at least I hope it's a cluster!) and make a note of the distance. Ideally, you want to get hold of a measuring device, so that you can get an accurate number every time. The idea then is that you repeat this process with all of your clubs using these two swing combinations.


One final point: you must hold your follow-through on every shot. Only then can you get accurate feedback. After just a few practice sessions you will find yourself calling the distance while the ball is still in the air – predicting whether it is short or long of your 'target' distance. In other words, you are developing essential feel.

comments | | Read More...
 
Design Template by panjz-online | Support by creating website | Powered by Blogger